In this Post We
will be using (Ubuntu 13.10) image to setup our LXC for multi host Hadoop
cluster setup. Below is the Environment used to setup LXC.
IMAGE
|
UBUNTU
13.10
|
VM
IMAGE SIZE
|
1.04
GB
|
DISK
SPACE
|
20+100GB
|
VIRTUAL
MACHINE RAM
|
1024MB
(3 GB Recommended)
|
USER/PASSWORD
|
User/password
|
ROOT
PASSWORD
|
password
|
Minimum
System Requirement:
HDD Space: 80 GB
RAM: 3-4 G.B Per Box
O.S: Windows7(Native)
Software
Installed On Each P.C:
1.
Vmware Player
Download URL: https://my.vmware.com/web/vmware/downloads
2.
Ubuntu image
Download URL:
http://www.traffictool.net/vmware/ubuntu1310.html
What
is LXC?
One
of the light weight virtualization solution. It provides benefit of faster
startup with less memory overheads. LXC containers occupy very little disk
space and filesystem of containers are independently stored in the native
operating systems filesystem.
Following
are the set of steps you need to follow to have LXC and required Node setup.
Step
1: Launch Ubuntu13.10 and launch Terminal.
Step
2: Change user to root.
Step
3: Download and update Ubuntu packages.


Step
5: Create LXC Container.


Step
7: Install LXC Web for Administration (Web Application to simplify
administration).

Step
8: Launch Web Console.

Enter
default user id and password (admin/admin). Once you enter you get an admin
console with various tabs. Check the status of the container you created using
command line in previous step. If it’s not running, click on ‘start’ to run.
(Remember
if it’s the first time you are running after creating your first container,
reboot the system by click on red color reboot button and try starting again.
You will find your container starts without any problem).

Step
9: Reboot the System.
Step
10: Start LXC Container (if already started start button will be disabled). You
can use stop and freeze if required.

For
Example if we create more containers we can start them by using the appropriate
start button as specified below.

Ensure
after you click on the start button it changes the status and marks the
container running as specified below.

Step
11: Check the status of the container by using command line as specified below
by using #lxc-ls –fancy command.

Step 12: Once up and running, attach to one container and launch the console. You can use Linux commands to browse the directories and files of each container but ensure they are up and running. Following set of commands illustrates how to attach, launch and exit console.

Step
13: Install essential package in the container(s). We can create one container,
install all essential packages and software and later we can clone it to create
other containers. Below command assumes that you have created the container
named myConatiner2, started the container from the webconsole and have launched
a console attached to the container. You can do this by using commands.
#lxc-create
–t Ubuntu –n myconatiner2
Start
it from web console as specified in step-9
#lxc-attach
–n mycontainer2
|
Once
you get the console attached use command as specified below.

Press
Y to complete the Installation. Once installed you get the prompt back as
specified in the below screen.

Now
mycontainer2 has the installed the set of common software from the repository
and its up-to-date. It’s time to prepare your container to have Java. Install
java as specified in the next step.
Step
14: Install Java on Container.

This
command starts fetching and installing Java (openjdk) which will be required to
setup Hadoop processes. Once the installation is done confirm installation
using Javac and Java commands as specified below.

Once
Java is installed we need to get the Hadoop distribution for which we will be
using wget utility. Next step will tell you how to install wget utility.
Step
15: Install wget utility on Container.
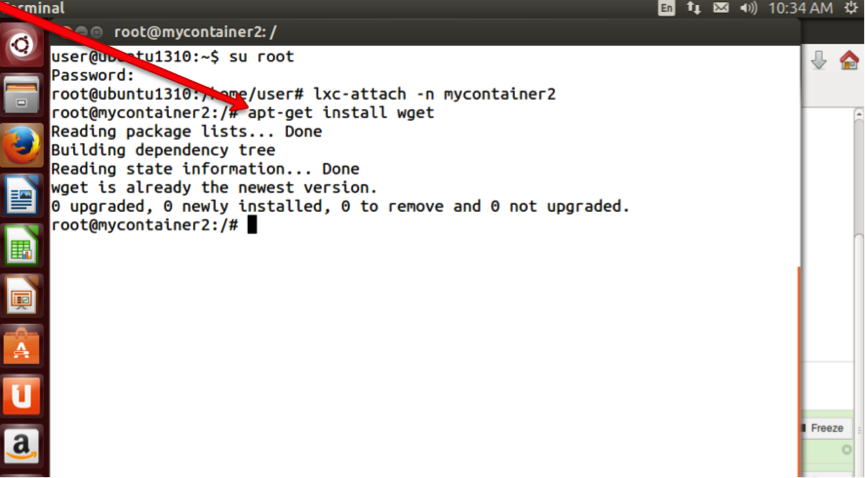
Step
16: Download and extract Hadoop1.2.1
Using
wget fetch Hadoop1.2.1 as specified below, ensure no mistakes are made in
typing the url. Before using wget ensure you create a directory (Hadoop) and
move in the directory to get the downloaded Hadoop binary in the current
folder.

Once
Downloaded extract it using tar command specified below.

Navigate in the extracted directory to ensure you have conf, bin and other folders to configure Hadoop.

Now
we have a container with Java and Hadoop libraries installed. We have to clone
(depending on the number of nodes you want to have in your cluster).
Step
17: Clone to have required number of Containers.
We
have to repeat this step, depending on the number of containers we want to have
in our cluster. Once nodes (containers ) are created, each will have its unique
ip and resource directories which we can use to implement our LAB:01(for complete courseware mail to info@xcelframeworks.com.
Stop
the container from webui as specified before you clone.

Clone
the container to have any number of clones you need and start the containers
again by clicking on the start button of the specified containers.


Ensure
all the containers you want are in running state.

Step
18: List and Verify Containers Status and IP Address.
Use
#lxc-ls –fancy to list the details of the containers created.

Once
all these steps are followed and you get the desired result, we are ready to
start with our Hadoop configuration we will be covering in next blog for full Lab Guide and courseware mail info@xcelframeworks.com .
No comments:
Post a Comment